Rainbow Drip Cake Magic Recipe
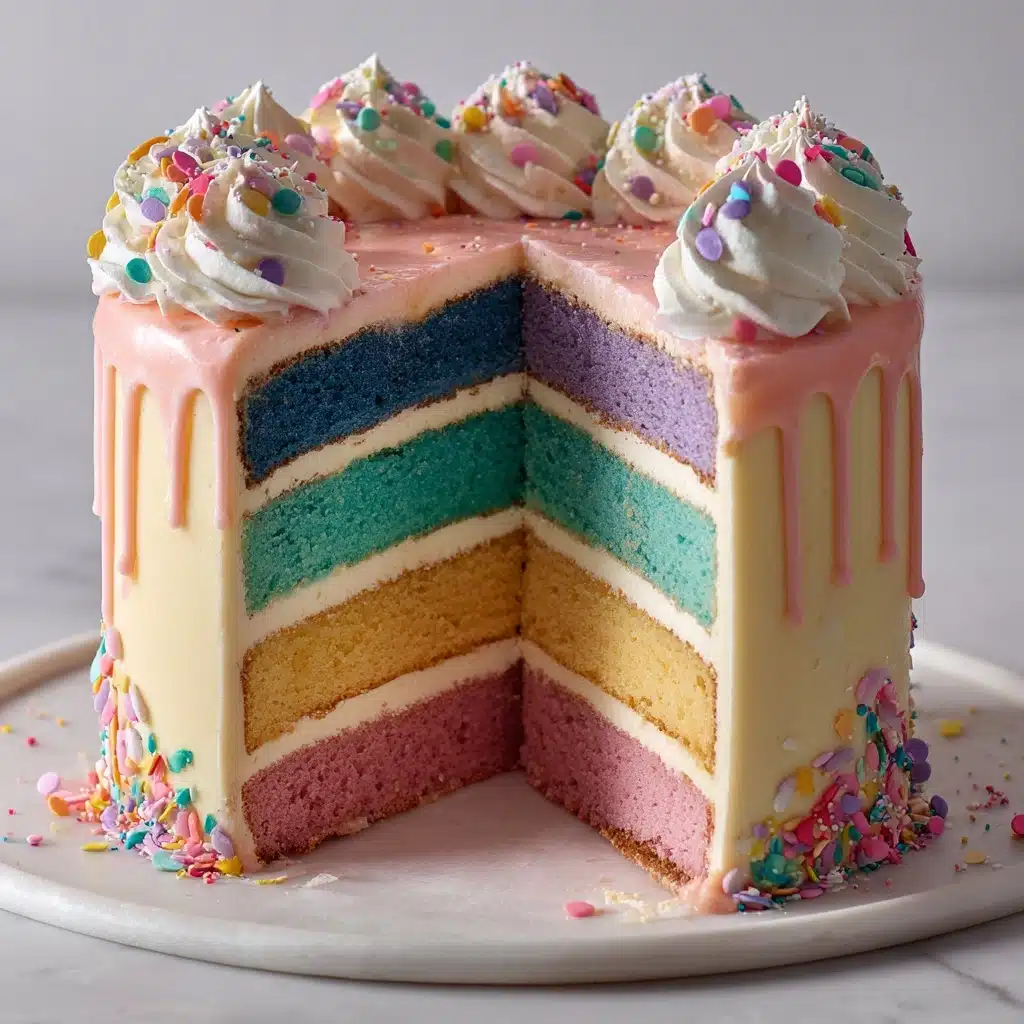
If you’re dreaming of a celebration centerpiece with the color, height, and wow-factor of your wildest baking dreams, Rainbow Drip Cake Magic is your ticket to pure joy. Imagine slicing into six perfectly vibrant layers—all wrapped in smooth buttercream and crowned with drips of edible rainbow ganache, sprinkles, and a shimmer of edible glitter. Every forkful is a party in your mouth, making Rainbow Drip Cake Magic the dessert that brings everyone to the table, wide-eyed and smiling. Whether it’s for a birthday, pride parade, or just to treat yourself, this showstopper cake is about transforming everyday ingredients into something truly spectacular.
Ingredients You’ll Need
Don’t be intimidated—Rainbow Drip Cake Magic might look fancy, but most of the ingredients are simple staples found in any kitchen. Each one plays its own important role, from structural flour to dreamy ganache, building a cake that’s as delightful to make as it is to eat.
- All-purpose flour: Provides the sturdy yet tender base for those tall rainbow layers.
- Baking powder: Gives the cake a gentle lift, keeping it airy without crumbling.
- Salt: Brightens and balances all the joyful sweetness in every bite.
- Unsalted butter (for both cake and frosting): The hero for a rich crumb and creamy, fluffy buttercream.
- Granulated sugar: Sweetens the cake perfectly—never gritty or overpowering.
- Large eggs: Add moisture and strength, keeping the layers plush and sliceable.
- Vanilla extract: A splash for that warm, comforting bakery-style aroma.
- Whole milk: Makes the batter smooth and helps those colors bake up evenly.
- Gel food coloring (red, orange, yellow, green, blue, purple): The secret to those eye-popping hues—deep colors with no extra liquid added.
- Powdered sugar (for frosting): Delivers sweetness and structure, dissolving for a silky finish.
- Heavy cream (for frosting and ganache): Whips the buttercream to ultimate fluffiness and makes the ganache drip, well… drip!
- White chocolate (for ganache): Melts buttery-smooth and takes on whatever color you dream up.
- Additional gel food coloring for ganache drip: Play with ombre, rainbow, or even pastels—go wild with it!
- Sprinkles or edible glitter: The finishing touch, making your cake totally celebration-ready.
How to Make Rainbow Drip Cake Magic
Step 1: Prep Your Pans and Mix Dry Ingredients
Start by preheating your oven to 350°F and prepping six 6-inch round cake pans (or plan to bake in batches if you don’t have that many). Grease and line each pan with parchment—this step is crucial to keep those vibrant layers perfectly intact. In a medium bowl, whisk together your flour, baking powder, and salt, ensuring everything is evenly combined for a consistent bake.
Step 2: Cream Butter and Sugar, Then Add Eggs and Vanilla
In a large bowl, get that unsalted butter and sugar mixing until it’s pale and super fluffy—this is where the cake starts getting its structure. Add eggs one at a time, mixing well after each addition, then blend in a generous tablespoon of vanilla extract for a sweet, aromatic base.
Step 3: Combine Wet and Dry Ingredients
Alternate adding your dry ingredients and the whole milk to the bowl, starting and ending with the dries. Mix just until everything is incorporated—don’t overdo it or your layers will be tough instead of luscious. You want a batter that’s smooth and easy to divide.
Step 4: Color and Bake the Rainbow Layers
Evenly divide your batter among six bowls. Tint each with its own beautiful color—red, orange, yellow, green, blue, and purple—using gel food coloring for brightness without thinning the batter. Pour each color into a separate prepared pan (or bake in batches!), smoothing the tops. Bake for 15–18 minutes, until a toothpick comes out clean and the tops are springy. Let those colorful cakes cool completely on a rack before frosting.
Step 5: Make the Buttercream Frosting
With your layers cooling, whip up the magical buttercream by beating your softened butter until creamy. Gradually add in powdered sugar, then drizzle in heavy cream, one tablespoon at a time, until the frosting is beautifully spreadable and fluffy. This is where the magic really begins—it’ll hold your stack together and provides a blank canvas for your rainbow drip.
Step 6: Stack and Frost the Cake
Place the purple layer on your cake board or plate, followed by a thin layer of buttercream. Continue with blue, green, yellow, orange, and finally red on top, making sure each is even and straight. Frost the entire cake with a light crumb coat and let it chill for 20 minutes, then apply a final coat of buttercream, smoothing it until your cake looks sleek and professional.
Step 7: Make and Tint the White Chocolate Ganache Drip
For the signature finishing touch, microwave white chocolate and ¼ cup heavy cream together in 20-second bursts, stirring until melted and creamy. Divide the ganache into small bowls, tinting each with your chosen gel colors. Once your cake is thoroughly chilled, use a spoon or squeeze bottle to drip colored ganache down the sides. This is your chance to get artistic and personalize your Rainbow Drip Cake Magic!
Step 8: Decorate!
While the ganache drip is still soft, bring on the sprinkles and edible glitter. Scatter them over the top and sides to your heart’s content—this is where your creation truly transforms into a party-worthy Rainbow Drip Cake Magic masterpiece.
How to Serve Rainbow Drip Cake Magic

Garnishes
No slice of Rainbow Drip Cake Magic is complete without a beautiful flourish of edible glitter, pastel sprinkles, or even whimsical shaped candies. These garnishes don’t just look delightful—they add a little crunch and sparkle that kids and adults both adore.
Side Dishes
A slice of Rainbow Drip Cake Magic pairs perfectly with a scoop of classic vanilla or fruity sorbet, which balances the richness and lets the colors pop. For a fancier occasion, a light fruit salad or a drizzle of raspberry coulis can add a touch of elegance and freshness alongside each slice.
Creative Ways to Present
Turn serving into a show by slicing the cake right at the table so everyone can admire those magic rainbow layers. Stack single-layer squares as individual desserts for a birthday party, or try mini cake pops made from trimmings for a playful, colorful treat!
Make Ahead and Storage
Storing Leftovers
To keep your Rainbow Drip Cake Magic fresh, store any leftovers well-covered in the fridge, where it will stay soft and tasty for up to three days. Make sure to keep it airtight so the vibrant colors and moist crumb stay picture-perfect.
Freezing
You can freeze the individual cake layers before assembly—just wrap them tightly in plastic and foil, then store in a freezer-safe bag for up to a month. Let them thaw at room temperature, then get creative with your frosting and ganache drip when you’re ready to assemble Rainbow Drip Cake Magic.
Reheating
This cake is best enjoyed at room temperature, so simply let chilled slices sit out for about 20 minutes before serving. Avoid microwaving, as this can melt the delicate buttercream and ganache drip, taking some magic away from your Rainbow Drip Cake Magic.
FAQs
Can I make this cake in advance?
Definitely! You can prepare the cake layers up to two days ahead and even frost the cake the day before serving. Just add the ganache drip and decorations shortly before your event so everything stays vibrant and show-stopping.
What’s the secret to getting really vibrant rainbow layers?
The trick is gel food coloring, which blends in for dramatic, saturated color without adding extra liquid. Make sure to add a little more color than you think, as the hues can fade slightly during baking—and always use a light hand with the batter so you don’t overmix.
How do I keep the ganache drip from running too far down the cake?
The key is to chill your frosted cake thoroughly before applying the ganache. A cold cake immediately slows the drip, giving you nice, defined drips rather than a messy puddle.
Can I use regular chocolate instead of white chocolate for the drip?
For Rainbow Drip Cake Magic, white chocolate is your best friend because it takes on gel color so easily. Dark or milk chocolate will tint the colors and not achieve that incredible brightness, so for the iconic rainbow effect, stick with white!
What’s the best way to cut clean slices with all those layers and ganache?
Use a sharp, large knife and dip it in hot water before each cut, wiping it dry between slices. This keeps each layer clean and defined, letting all those gorgeous colors of your Rainbow Drip Cake Magic shine in every piece.
Final Thoughts
Baking Rainbow Drip Cake Magic isn’t just about making a dessert—it’s about inviting a little color and happiness into your kitchen. Whether you’re a seasoned cake artist or trying your first rainbow layer, this recipe promises a joyful baking adventure and a spectacular reward. Gather your ingredients and jump in—your masterpiece (and lots of new fans) await!
Print
Rainbow Drip Cake Magic Recipe
- Total Time: 1 hour 5 minutes
- Yield: 12 servings 1x
- Diet: Vegetarian
Description
Indulge in the magic of colors with this stunning Rainbow Drip Cake. Each layer of moist, colorful cake is stacked with creamy buttercream frosting and topped with a mesmerizing white chocolate drip. Perfect for birthdays and celebrations!
Ingredients
Cake Layers:
- 2 ½ cups all-purpose flour
- 2 ½ teaspoons baking powder
- ½ teaspoon salt
- 1 cup unsalted butter, softened
- 2 cups granulated sugar
- 4 large eggs, room temperature
- 1 tablespoon vanilla extract
- 1 cup whole milk
- Gel food coloring in red, orange, yellow, green, blue, and purple
Frosting:
- 2 cups unsalted butter, softened
- 5 cups powdered sugar
- 2–4 tablespoons heavy cream
White Chocolate Ganache:
- 6 oz white chocolate
- ¼ cup heavy cream
- Additional gel food coloring for drip
Decoration:
- Sprinkles or edible glitter
Instructions
- Prepare Cake Layers: Preheat oven, mix dry ingredients, cream butter and sugar, add eggs and vanilla, alternate dry ingredients and milk, divide and tint batter, bake in pans.
- Make Frosting: Beat butter, add powdered sugar and cream gradually until fluffy.
- Assemble Cake: Stack cooled cake layers with frosting between each, apply crumb coat, chill, then apply final coat.
- Create Drip: Heat white chocolate and cream, tint, create drips on chilled cake.
- Decorate: Add sprinkles or glitter as desired.
Notes
- Chill cake before dripping for better control.
- Gel food coloring maintains batter and ganache consistency.
- Refrigerate cake for up to 3 days.
- Prep Time: 45 minutes
- Cook Time: 20 minutes
- Category: Dessert
- Method: Baking
- Cuisine: American
Nutrition
- Serving Size: 1 slice
- Calories: 620
- Sugar: 62 g
- Sodium: 180 mg
- Fat: 32 g
- Saturated Fat: 19 g
- Unsaturated Fat: 10 g
- Trans Fat: 1 g
- Carbohydrates: 80 g
- Fiber: 1 g
- Protein: 4 g
- Cholesterol: 115 mg


