Christmas Tree Brownies Recipe
If there’s one dessert that instantly brightens up any holiday table, it has to be Christmas Tree Brownies. These adorable, tree-shaped treats combine fudgy, chocolate-rich brownie goodness with all the fun and sparkle of festive decorating. Whip up a batch and you’ll quickly see: not only are they ridiculously fun to make (especially with kids), but they’re downright irresistible at every holiday party or cookie swap.
Ingredients You’ll Need
What I adore about Christmas Tree Brownies is how a handful of everyday ingredients turn into something so magical. Each component plays an important role—bringing flavor, cheer, and a real sense of celebration to every bite!
- Brownie Mix: This quick shortcut delivers chocolatey, moist base layers with minimal fuss—use your favorite brand or go homemade if you prefer.
- Eggs, Oil, Water: Classic add-ins for your mix, giving structure and that lovely fudgy texture everyone loves.
- Green Frosting or Icing: Brings your “trees” to life with color—store-bought or homemade both work!
- Holiday Sprinkles: Instantly festive, they add sparkle and playful crunch (think ornaments for your edible trees).
- Mini Candy Canes (halved): Serve as the cutest little edible tree trunks—plus, who doesn’t love a surprise peppermint bite?
- Powdered Sugar (optional): Just a dusting turns your brownies into a winter wonderland with a snowy finish.
- Star-Shaped Candies or Yellow M&M’s: The perfect topper for your trees, giving a classic holiday look and a little pop of sweet color.
How to Make Christmas Tree Brownies
Step 1: Mix and Bake Your Brownies
Begin by preheating your oven to the temperature specified on your brownie mix—this is usually 350°F (175°C). Prepare the brownie mix as directed on the box, stirring in the eggs, oil, and water until the batter is smooth and glossy. Pour that decadent mixture into a greased 9×13-inch baking pan, smoothing out the top with a spatula for even baking. Pop it in the oven, and let the magic happen until your kitchen smells like pure chocolatey happiness. Once baked, let your brownies cool completely—patience here pays off for neat, perfect slices later.
Step 2: Cut and Shape Your Trees
Once your brownies are cool to the touch (this is crucial for clean cuts!), gently lift them from the pan. Slice the large rectangle into long strips, then cut each strip into triangles by making diagonal cuts. Each triangle is about to become a cheerful Christmas tree! Here’s a tip: chill the brownies for 30 minutes in the fridge first for the crispest edges, and wipe your knife between cuts for a polished finish.
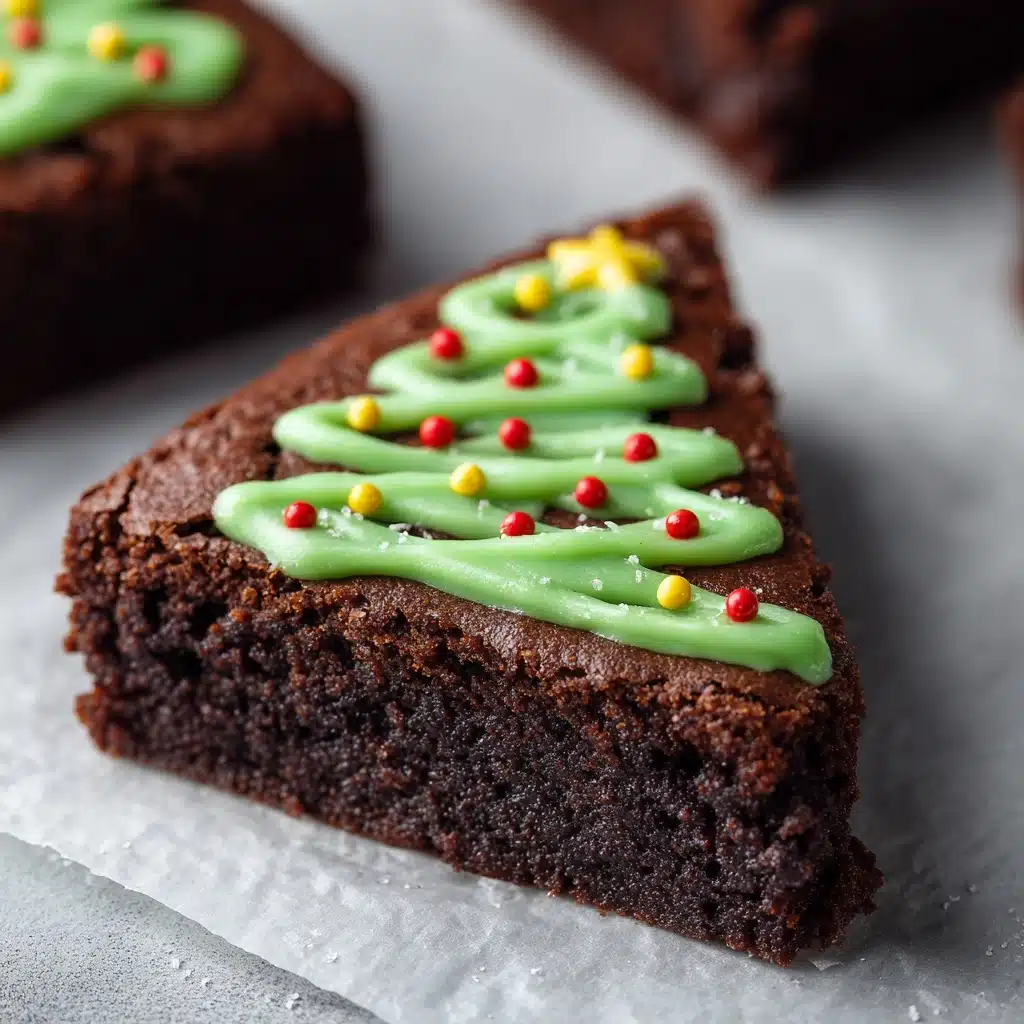
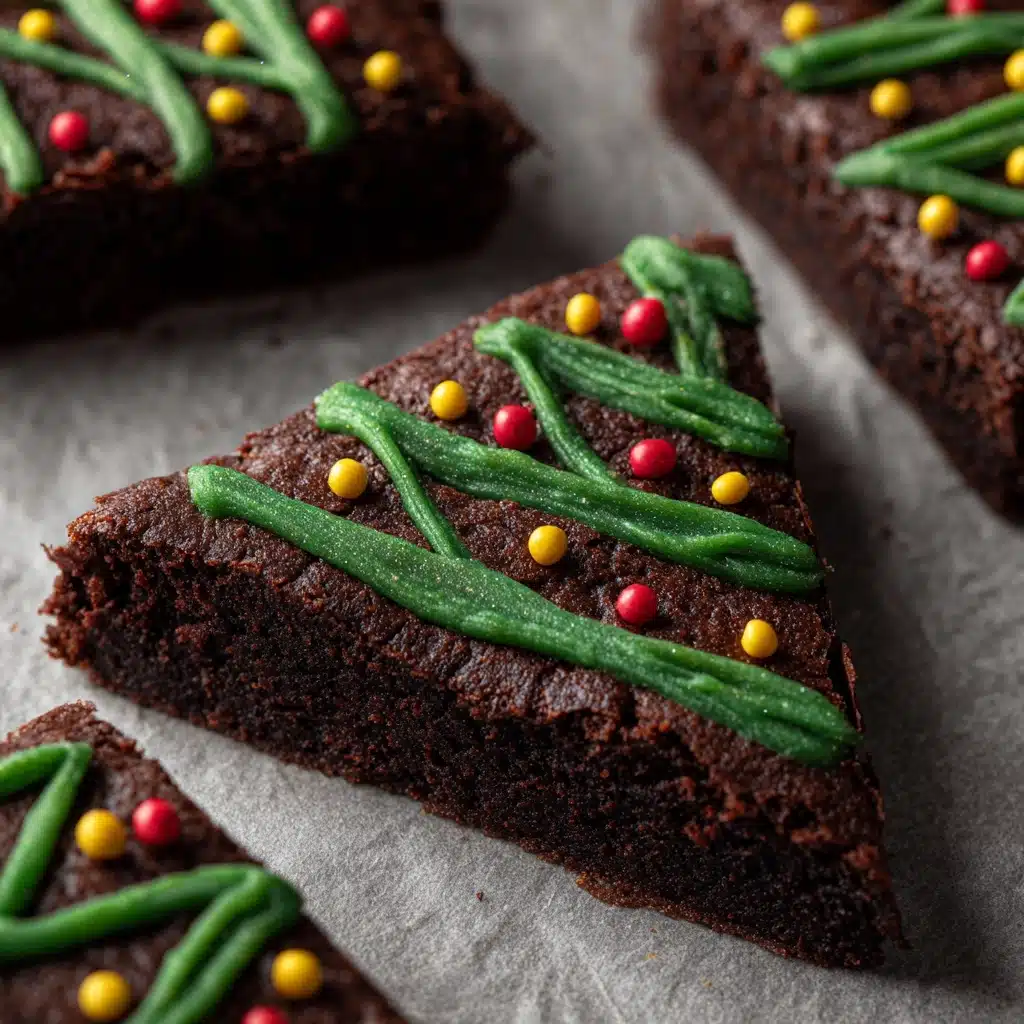
Step 3: Decorate with Frosting
Time to get creative! Nestle a halved mini candy cane into the base of each brownie triangle so it looks just like a tree trunk. Next, pipe or spread green frosting in a zigzag, swirly “garland” across your tree shape. The more playful, the better—there are no rules here except “have fun!” If you’re making green icing from scratch, a little gel food coloring goes a long way for vibrant color.
Step 4: Add Holiday Decorations
While the frosting is still soft, sprinkle on a generous dose of colorful holiday sprinkles—imagine each one as a little ornament or twinkling light. Finish with a star-shaped candy (or yellow M&M) at the very top of the tree. It’s those little details that make these Christmas Tree Brownies almost too cute to eat.
Step 5: The Optional Snowy Touch
For a winter wonderland effect, dust the tops with a bit of powdered sugar. It takes just a few seconds, but the snowy finish is absolutely delightful—like the softest first snowfall on your own forest of brownies!
How to Serve Christmas Tree Brownies
Garnishes
For that special finishing touch, consider serving your brownies on a festive platter sprinkled with extra powdered sugar or a scattering of edible glitter stars. A few sprigs of rosemary or crushed peppermint scattered around can add an extra pop of color and a touch of holiday fragrance on your dessert table. These simple garnishes make your Christmas Tree Brownies look like a baker’s dream and spark conversation at every party.
Side Dishes
Pair your brownies with mugs of hot cocoa, steamed milk, or even a tray of fresh fruit and nuts for a holiday dessert spread that pleases all ages. If you’re going all out, try serving them with a scoop of vanilla ice cream—the contrast with warm brownie and cold ice cream is simply unbeatable. These festive brownies also work wonderfully as part of a cookie exchange or dessert buffet, with their cheerful shapes bringing a smile to everyone’s face.
Creative Ways to Present
Display each decorated brownie upright in a cupcake liner for easy individual servings (kids love these at classroom parties). For gift-giving, wrap each Christmas Tree Brownie in clear cellophane tied with ribbon, or line them up in a festive gift box for homemade edible gifts from the heart. If you’re making these for a gathering, try standing “trees” upright in a block of floral foam covered with fake snow for a unique holiday centerpiece that’s as fun to look at as it is to eat!
Make Ahead and Storage
Storing Leftovers
After your holiday gathering, any leftover Christmas Tree Brownies can be stored in an airtight container at room temperature for up to 3 days. Keep the container away from direct heat or sunlight to help the frosting and decorations stay fresh and pretty. If you’ve already dusted them with powdered sugar, be aware it may absorb over time, so add a fresh sprinkle right before serving again for that snowy effect.
Freezing
Brownies freeze beautifully! Simply arrange your decorated (or undecorated) Christmas Tree Brownies in a single layer on a tray and freeze for one hour, then transfer to a resealable bag with parchment between layers. You can freeze them for up to 3 months. When ready to serve, just thaw at room temperature—add your powdered sugar or extra decorations after thawing for best results.
Reheating
If you enjoy your brownies just slightly warm (who doesn’t?), pop individual pieces in the microwave for 7 to 10 seconds. If the brownies are frozen, it’s best to let them thaw first to avoid melting the frosting or decorations. Warming brings out the gooey, chocolatey center and makes each bite extra luscious—a sweet way to recapture that fresh-from-the-oven taste!
FAQs
How do I keep the brownie edges from crumbling when slicing?
For the cleanest, crispest slices, make sure your brownies are fully cooled (even chilled for 30 minutes in the fridge). Use a long, sharp knife and clean it between cuts. This prevents crumbs and helps you get those perfect triangle shapes for your Christmas Tree Brownies.
Can I make these brownies ahead of time?
Absolutely! You can bake the brownie base up to two days ahead, then slice and decorate them the day you plan to serve. If making far in advance, freeze the undecorated triangles and add frosting and garnishes fresh for the best color and texture.
What’s the best way to color homemade icing green?
Gel food coloring is your best friend for vibrant, tree-green frosting. Start with a small amount and mix thoroughly—gel colors are more concentrated than liquid types, so you’ll achieve a deeper color without thinning your icing.
What if I can’t find star-shaped candies for the top?
No worries! Yellow M&M’s, gold sugar pearls, or even a simple piped dot of yellow frosting make charming “stars” for your Christmas Tree Brownies. Get creative and use whatever festive “star” candies you have on hand.
Can I use a homemade brownie recipe instead of a mix?
Definitely! If you have a favorite homemade brownie recipe, feel free to use it as your brownie base. Just make sure to use a 9×13-inch pan for the right thickness and cooling time. The beauty of Christmas Tree Brownies is how adaptable they are to your own kitchen traditions.
Final Thoughts
Nothing brings a smile like festive desserts, and these Christmas Tree Brownies are proof positive of just how fun (and delicious!) the holidays can be. Invite friends or family to join in the decorating, share a few laughs, and enjoy every fudgy, sprinkle-studded bite—your holiday season just got a little sweeter.
Print
Christmas Tree Brownies Recipe
- Total Time: 40 minutes (plus cooling)
- Yield: 12 Christmas tree brownies 1x
- Diet: Vegetarian
Description
These Christmas Tree Brownies are a fun and festive treat that are perfect for the holiday season. Delicious brownies are transformed into cute Christmas trees with green frosting, candy cane trunks, and colorful decorations.
Ingredients
Brownie Trees:
- 1 box brownie mix (plus ingredients listed on the box, typically eggs, oil, and water)
Decorations:
- Green frosting or icing (store-bought or homemade)
- Holiday sprinkles
- Mini candy canes (halved)
- Powdered sugar (optional for dusting)
- Star-shaped candies or yellow M&M’s (for topping)
Instructions
- Preheat the Oven: Preheat the oven to the temperature listed on your brownie mix (usually 350°F / 175°C).
- Prepare the Brownies: Prepare the brownie mix according to package directions and pour into a greased 9×13-inch baking pan. Bake as directed and allow to cool completely.
- Cut and Shape: Once cooled, cut the brownies into long rectangles, then slice diagonally across each rectangle to form triangle ‘tree’ shapes. Insert a halved mini candy cane into the bottom of each triangle to create a ‘tree trunk.’
- Decorate: Pipe or spread green frosting in a zigzag pattern on each triangle to resemble garland. Decorate with sprinkles and place a star candy or yellow M&M at the top of each tree.
- Optional: Dust with powdered sugar for a snowy effect. Serve and enjoy!
Notes
- For cleaner cuts, chill the brownies before slicing.
- Use gel food coloring in white frosting if making your own green icing.
- Prep Time: 15 minutes
- Cook Time: 25 minutes
- Category: Dessert
- Method: Baking
- Cuisine: American
Nutrition
- Serving Size: 1 tree
- Calories: 220
- Sugar: 21g
- Sodium: 150mg
- Fat: 11g
- Saturated Fat: 4g
- Unsaturated Fat: 6g
- Trans Fat: 0g
- Carbohydrates: 30g
- Fiber: 1g
- Protein: 2g
- Cholesterol: 25mg


