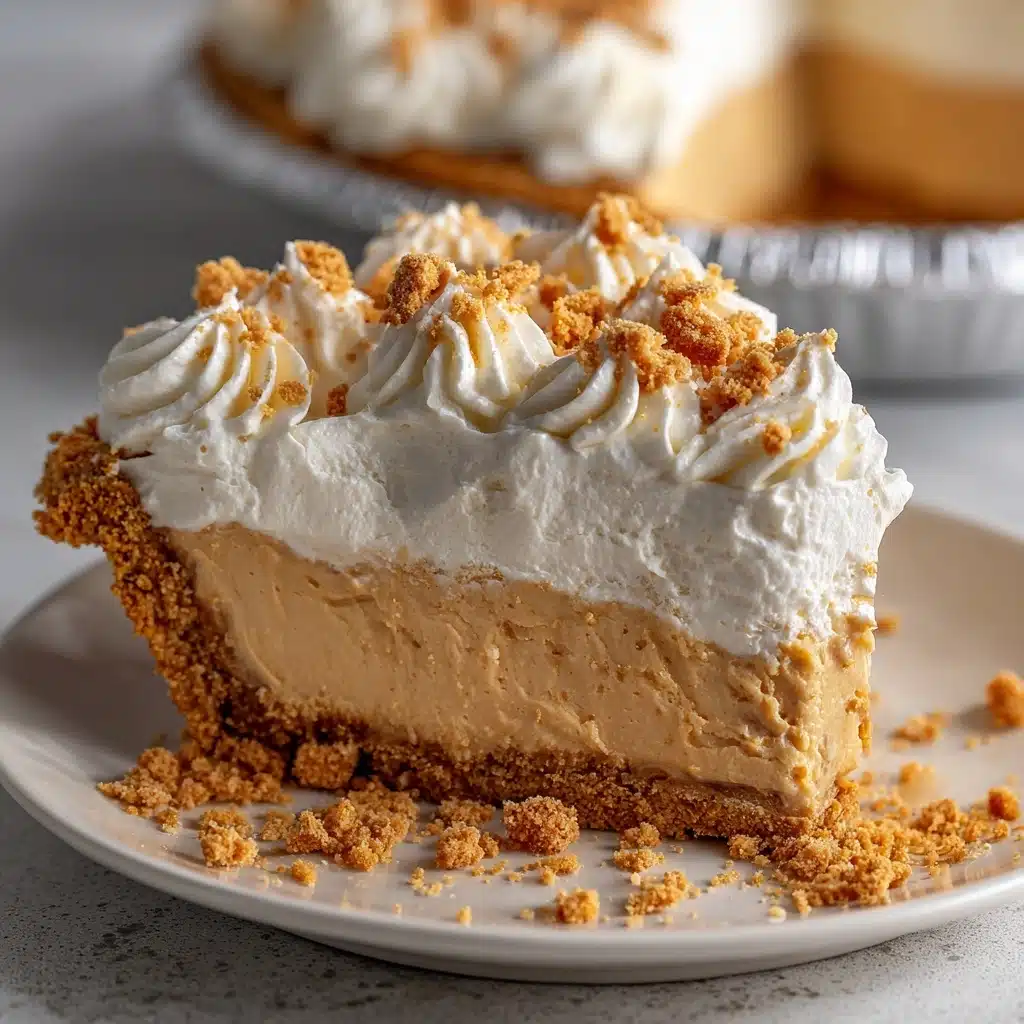
Easy Peanut Butter Pie Recipe
If you’re on the hunt for a show-stopping dessert that’s as easy as it is irresistible, look no further than this Easy Peanut Butter Pie. With its lusciously creamy filling and classic graham cracker crust, this pie delivers rich peanut butter flavor in every bite, all with minimal effort. It’s the kind of recipe that will become an instant family favorite, perfect for last-minute gatherings, special occasions, or anytime you’re craving a treat that strikes the perfect balance between salty and sweet.
Ingredients You’ll Need
The beauty of Easy Peanut Butter Pie is how it transforms a few staple ingredients into something utterly crave-worthy. Each component brings its own magic to the final dish, helping with everything from the crust’s crunch to the filling’s fluffiness and flavor.
- Graham cracker pie crust: Go for a classic 9-inch shell for a sweet, crumbly base that holds everything together perfectly.
- Creamy peanut butter: The star of the show brings depth and nutty richness to every slice—make sure to use the creamy kind for best results.
- Cream cheese, softened: Adds a tangy, creamy backbone that makes the filling extra decadent and smooth.
- Powdered sugar: Sweetens the deal and helps achieve a silky filling without any grittiness.
- Whipped topping (like Cool Whip), thawed: Folds in beautiful lightness and ensures the pie sets up perfectly in the fridge.
- Chopped peanuts (optional): A crunchy finish that adds texture and extra peanut flair—especially fun for peanut butter lovers.
- Chocolate syrup or melted chocolate for drizzling (optional): A final flourish of chocolatey drama that pairs perfectly with the peanut butter base.
How to Make Easy Peanut Butter Pie
Step 1: Make the Creamy Peanut Butter Filling
Start by grabbing a large mixing bowl and putting in the creamy peanut butter, softened cream cheese, and powdered sugar. Use a hand mixer or stand mixer and beat these ingredients together until you have an ultra-smooth, creamy mixture. There shouldn’t be any lumps—just a dreamy peanut butter frosting-like filling waiting for that extra fluff.
Step 2: Fold in the Whipped Topping
Now, it’s time to lighten things up. Gently fold the thawed whipped topping into the peanut butter mixture. This step is key: folding, rather than stirring, keeps the filling light and gives the Easy Peanut Butter Pie its signature mousse-like texture. Take your time and fold until no streaks remain.
Step 3: Fill the Pie Crust
Spoon the peanut butter filling into your graham cracker pie crust. Use a spatula to smooth the top, aiming for a nice, even surface. Don’t be afraid to get creative with a few swoops and swirls—presentation is part of the fun here!
Step 4: Add Toppings (Optional)
If you’re feeling fancy, sprinkle chopped peanuts over the surface for crunch, and drizzle chocolate syrup or melted chocolate across the top. This not only looks gorgeous, but adds extra bursts of flavor that pair perfectly with the peanut butter filling.
Step 5: Chill to Set
Cover the pie and refrigerate for at least four hours (overnight is even better). Chilling firms everything up and allows the flavors to meld, so don’t skip this part! When you’re ready to serve, slice it up and enjoy your masterpiece nice and cold.
How to Serve Easy Peanut Butter Pie

Garnishes
An artful garnish elevates every slice of Easy Peanut Butter Pie, turning a simple dessert into something celebration-worthy. Go traditional with a scattering of chopped peanuts and a zigzag of chocolate syrup, or add a dollop of extra whipped topping and a dusting of cocoa powder for flair. If you’re a chocolate fanatic, chocolate curls or mini chocolate chips add an extra wink to any plate.
Side Dishes
This pie is so rich and creamy that simple sides are best. A tall glass of cold milk or a hot cup of coffee is a classic pairing. For a lighter touch, offer fresh berries or a crisp fruit salad on the side—the tartness and brightness beautifully contrast the pie’s sweet, nutty richness.
Creative Ways to Present
For personal-sized treats, divide the filling among mini tart shells or serve in small jars for a picnic-ready twist. Want to impress? Swirl a bit of melted chocolate at the bottom of each slice before plating, or serve wedges with a scoop of vanilla ice cream. However you present it, this pie is always a showstopper!
Make Ahead and Storage
Storing Leftovers
Keep any leftover Easy Peanut Butter Pie covered in the fridge, either in its original pie plate wrapped well or in an airtight container. It will stay fresh and delicious for up to four days, making it a perfect make-ahead dessert for busy weeks or unexpected company.
Freezing
This pie freezes beautifully! Simply wrap the entire pie—or individual slices—in plastic wrap and then foil. Freeze for up to one month. When you’re ready for a sweet treat, thaw overnight in the fridge. The texture stays creamy and the flavor is just as dreamy.
Reheating
No need to reheat this no-bake wonder! For the best taste and texture, always serve Easy Peanut Butter Pie chilled straight from the fridge. If you’ve frozen it, just be sure to let it thaw completely before slicing and serving.
FAQs
Can I use a homemade crust instead of store-bought?
Absolutely! Feel free to make your own graham cracker or chocolate cookie crust if you have a little extra time—the homemade touch adds even more flavor to this Easy Peanut Butter Pie.
What kind of peanut butter works best?
Creamy, shelf-stable peanut butter (like Jif or Skippy) gives the best smooth and stable filling. Natural peanut butter can separate or be too oily, affecting the final texture.
Can I make Easy Peanut Butter Pie in advance?
Yes! In fact, it’s even better when made ahead. Prep and chill up to two days before serving for the sliceable, set pie everyone loves.
How can I make this pie gluten-free?
Just use a gluten-free graham cracker crust and double-check that your add-ins (like chocolate syrup) are gluten-free. The rest of the ingredients are naturally gluten-free!
Can I swap out the whipped topping for real whipped cream?
You can, but go for softly whipped cream (just to medium peaks) so the filling holds together. Measure out eight ounces by weight, or about three cups whipped. The result will be slightly different in texture but still fabulously tasty.
Final Thoughts
There’s just something about Easy Peanut Butter Pie—creamy, dreamy, and always a hit. Whether you’re a lifelong peanut butter lover or just looking for a quick, crowd-pleasing dessert, this recipe is sure to win you over. Give it a try and see why it’s a family favorite you’ll want to make again and again!
Print
Easy Peanut Butter Pie Recipe
- Total Time: 4 hours 10 minutes (includes chilling)
- Yield: 8 slices 1x
- Diet: Non-Vegetarian
Description
Indulge in the creamy and rich goodness of this Easy Peanut Butter Pie. A no-bake dessert that’s perfect for any occasion!
Ingredients
Pie Crust:
- 1 (9-inch) graham cracker pie crust
Filling:
- 1 cup creamy peanut butter
- 8 ounces cream cheese, softened
- ¾ cup powdered sugar
- 1 (8-ounce) tub whipped topping (like Cool Whip), thawed
Toppings (optional):
- ¼ cup chopped peanuts
- chocolate syrup or melted chocolate for drizzling
Instructions
- Prepare Filling: In a large mixing bowl, beat together peanut butter, softened cream cheese, and powdered sugar until smooth and creamy.
- Add Whipped Topping: Gently fold in the whipped topping until fully combined and fluffy.
- Fill Crust: Spoon the mixture into the graham cracker crust and smooth the top with a spatula.
- Add Toppings: Optionally, sprinkle with chopped peanuts and drizzle with chocolate syrup or melted chocolate.
- Chill: Cover and chill for at least 4 hours or overnight until set.
- Serve: Slice and serve cold.
Notes
- For a richer flavor, use a chocolate graham crust or Oreo crust.
- You can add a layer of melted chocolate at the bottom of the crust for extra indulgence.
- This pie can be made up to 2 days in advance for convenience.
- Prep Time: 10 minutes
- Cook Time: 0 minutes
- Category: Dessert
- Method: No-Bake
- Cuisine: American
Nutrition
- Serving Size: 1 slice
- Calories: 430
- Sugar: 20g
- Sodium: 290mg
- Fat: 32g
- Saturated Fat: 12g
- Unsaturated Fat: 16g
- Trans Fat: 0g
- Carbohydrates: 28g
- Fiber: 2g
- Protein: 9g
- Cholesterol: 30mg


