Frosted Coffee Brownies Recipe
Frosted Coffee Brownies are the ultimate pick-me-up dessert for anyone who loves the bold flavor of coffee paired with intense, fudgy chocolate. Imagine a deep, rich brownie, made extra special with a touch of coffee both in the batter and a luscious, mocha-style frosting layered on top. Whether you’re serving them at a gathering or just treating yourself with an afternoon coffee break, these brownies never fail to impress. Let’s jump into everything you need to bring these decadent treats to life!
Ingredients You’ll Need

Ingredients You’ll Need
With Frosted Coffee Brownies, every ingredient counts; they each play a starring role in bringing you that perfect balance of sweetness, melt-in-your-mouth texture, and a subtle buzz of coffee. Don’t worry, you probably have everything on hand!
- Unsalted butter (1 cup, melted): Provides richness and that classic chewy-brownie texture.
- Granulated sugar (2 cups): Sweetens the brownies and helps create a shiny, crackly top.
- Large eggs (4): Bind everything together and give a fudgy consistency.
- Vanilla extract (1 tablespoon): Boosts the flavor and rounds out the chocolate and coffee notes.
- Unsweetened cocoa powder (3/4 cup): Lends deep, intense chocolate flavor.
- Instant coffee granules (1 tablespoon): The key to that irresistible coffee kick in each bite.
- All-purpose flour (1 cup): Keeps the brownies dense yet not overly heavy.
- Salt (1/2 teaspoon): Enhances all the other flavors and balances sweetness.
- Semi-sweet chocolate chips (1 cup): Ensures little pockets of gooey chocolate with every bite.
- For the frosting:
- Unsalted butter (1/2 cup, softened): Makes the frosting ultra creamy and spreadable.
- Powdered sugar (2 cups): Gives the frosting its classic sweetness and smooth texture.
- Unsweetened cocoa powder (2 tablespoons): Deepens the chocolate flavor in the frosting.
- Instant coffee granules dissolved in 2 tablespoons warm milk (1 tablespoon): Infuses the frosting with bold coffee flavor and helps achieve the perfect spreading consistency.
- Vanilla extract (1/2 teaspoon): Finishes the frosting with just the right amount of warmth and aroma.
- Pinch of salt: Balances the sweetness in the frosting for a well-rounded flavor.
How to Make Frosted Coffee Brownies
Step 1: Prepare the Pan and Preheat
Start by preheating your oven to 350°F (175°C) and greasing or lining a 9×13-inch baking pan with parchment paper. This little extra step will make it so much easier to lift the brownies out later, and ensures none of the fudgy edges get lost!
Step 2: Mix the Wet Ingredients
In a large mixing bowl, whisk together the melted butter, granulated sugar, eggs, and vanilla extract until the mixture looks glossy and smooth. This forms the base for super chewy, luscious Frosted Coffee Brownies.
Step 3: Add Dry Ingredients and Coffee
Now sift in the cocoa powder, instant coffee granules, all-purpose flour, and salt. Stir until just combined, being careful not to overmix—we want tender, moist brownies, not cake! Right at the end, gently fold in the semi-sweet chocolate chips for bursts of chocolate bliss.
Step 4: Bake the Brownies
Spread the batter evenly in your prepared pan. Bake for 28 to 32 minutes, or until a toothpick inserted into the center comes out with moist crumbs. Trust me, underbaking ever-so-slightly guarantees gooey, dreamy centers that make these Frosted Coffee Brownies unforgettable.
Step 5: Cool Completely
Resist the temptation to frost them right away! Let the brownies cool completely in the pan—this helps the frosting spread smoothly and keeps the brownies’ fudgy texture intact.
Step 6: Whip Up the Mocha Frosting
For the crowning glory, beat softened butter until creamy, then gradually add the powdered sugar, cocoa powder, dissolved instant coffee (make sure it’s fully dissolved in warm milk), vanilla, and salt. Beat everything until fluffy and perfectly spreadable.
Step 7: Frost and Slice
Spread the mocha frosting generously over the cooled brownies. Use a spatula or the back of a spoon to make neat swirls and swoops. Let the frosting set just a little, then cut into squares and get ready to swoon!
How to Serve Frosted Coffee Brownies
Garnishes
A flourish of chocolate shavings, a sprinkle of cocoa powder, or a handful of chocolate-covered espresso beans on top adds a gorgeous touch to your Frosted Coffee Brownies. For a cafe-style vibe, you can even dust with a tiny pinch of flaky sea salt just before serving.
Side Dishes
These brownies are absolutely divine on their own, but if you want to take things up a notch, pair them with a scoop of vanilla ice cream or a dollop of lightly whipped cream. For afternoon snacks, a strong cup of coffee, cappuccino, or even iced coffee matches perfectly with their mocha magic.
Creative Ways to Present
Hosting a party? Try cutting your Frosted Coffee Brownies into bite-sized pieces for a dessert platter. Arrange them in cupcake liners or top each square with a swirl of whipped cream for extra wow factor. For gifts, layer them in a bakery box with parchment paper and tie with twine for a treat that’s both beautiful and delicious.
Make Ahead and Storage
Storing Leftovers
Frosted Coffee Brownies keep beautifully in an airtight container at room temperature for up to four days. The flavors actually deepen over time, so if you have any leftovers (which is rare), you’re in for an even richer treat the next day!
Freezing
To freeze, place unfrosted or frosted brownies in a single layer on a baking sheet until firm, then wrap each piece tightly in plastic wrap. Store in a freezer-safe bag or container for up to two months. Thaw overnight in the refrigerator before serving (and add fresh frosting if you froze them unfrosted).
Reheating
For that just-baked taste, pop a brownie square in the microwave for 10-15 seconds. If you want the frosting to stay intact, reheat unfrosted brownies and frost them while just slightly warm for an extra luscious finish.
FAQs
Can I use regular brewed coffee instead of instant coffee granules?
While brewed coffee adds some flavor, instant coffee granules give much more punch in both the batter and frosting. If you must substitute, use a super concentrated brewed coffee, but be mindful of the added liquid; adjust the recipe as needed.
How can I make my Frosted Coffee Brownies even more fudgy?
For extra fudginess, slightly underbake the brownies so that the center is set but still moist. Also, avoid overmixing the batter, and use the full amount of butter as it contributes to that rich, decadent texture.
Are there any nut-free or dairy-free options?
You can make these nut-free by simply omitting any nut add-ins (none are in this recipe). For dairy-free brownies, try using a trusted vegan butter and non-dairy milk for the frosting; the result will still be delicious!
Why did my brownies turn out cakey instead of fudgy?
Cakey brownies often result from overmixing or using too much flour. Make sure to fold the flour in gently and not to overbake; keep an eye on them starting at the 28-minute mark for that perfect rich center.
Can I double the recipe for a crowd?
Absolutely! Double all the ingredients and use two 9×13-inch pans, or a larger baking sheet if you have one. Just check for doneness, since a bigger batch may require an extra few minutes in the oven.
Final Thoughts
If you’re craving the cozy, satisfying blend of chocolate and coffee in dessert form, these Frosted Coffee Brownies are your ticket to instant bliss. Don’t hesitate—grab your mixing bowl and treat yourself and your loved ones to a batch soon. They’ll quickly become a new favorite in your baking rotation!
Print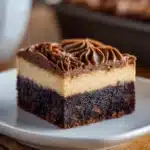
Frosted Coffee Brownies Recipe
- Total Time: 45 minutes
- Yield: 16 brownies 1x
- Diet: Vegetarian
Description
Indulge in the rich and decadent flavors of these Frosted Coffee Brownies. A perfect combination of chocolate and coffee, these moist brownies topped with a coffee-infused frosting are a coffee lover’s dream.
Ingredients
Brownie Batter:
- 1 cup unsalted butter (melted)
- 2 cups granulated sugar
- 4 large eggs
- 1 tablespoon vanilla extract
- ¾ cup unsweetened cocoa powder
- 1 tablespoon instant coffee granules
- 1 cup all-purpose flour
- ½ teaspoon salt
- 1 cup semi-sweet chocolate chips
Frosting:
- ½ cup unsalted butter (softened)
- 2 cups powdered sugar
- 2 tablespoons unsweetened cocoa powder
- 1 tablespoon instant coffee granules dissolved in 2 tablespoons warm milk
- ½ teaspoon vanilla extract
- pinch of salt
Instructions
- Preheat oven and prepare pan: Preheat oven to 350°F (175°C) and grease or line a 9×13-inch baking pan with parchment paper.
- Mix brownie batter: In a large bowl, whisk together melted butter, sugar, eggs, and vanilla. Stir in cocoa powder, coffee granules, flour, and salt. Fold in chocolate chips. Pour into pan.
- Bake brownies: Bake for 28–32 minutes until a toothpick inserted comes out with moist crumbs. Cool completely.
- Prepare frosting: Beat softened butter, add powdered sugar, cocoa, dissolved coffee, vanilla, and salt. Beat until smooth and fluffy.
- Frost brownies: Spread frosting over cooled brownies. Cut into squares and serve.
Notes
- For a stronger coffee flavor, add an extra teaspoon of instant coffee to the batter.
- Store frosted brownies in an airtight container for up to 4 days.
- Prep Time: 15 minutes
- Cook Time: 30 minutes
- Category: Dessert
- Method: Baking
- Cuisine: American
Nutrition
- Serving Size: 1 brownie
- Calories: 310
- Sugar: 28g
- Sodium: 140mg
- Fat: 17g
- Saturated Fat: 10g
- Unsaturated Fat: 6g
- Trans Fat: 0g
- Carbohydrates: 39g
- Fiber: 2g
- Protein: 3g
- Cholesterol: 60mg


