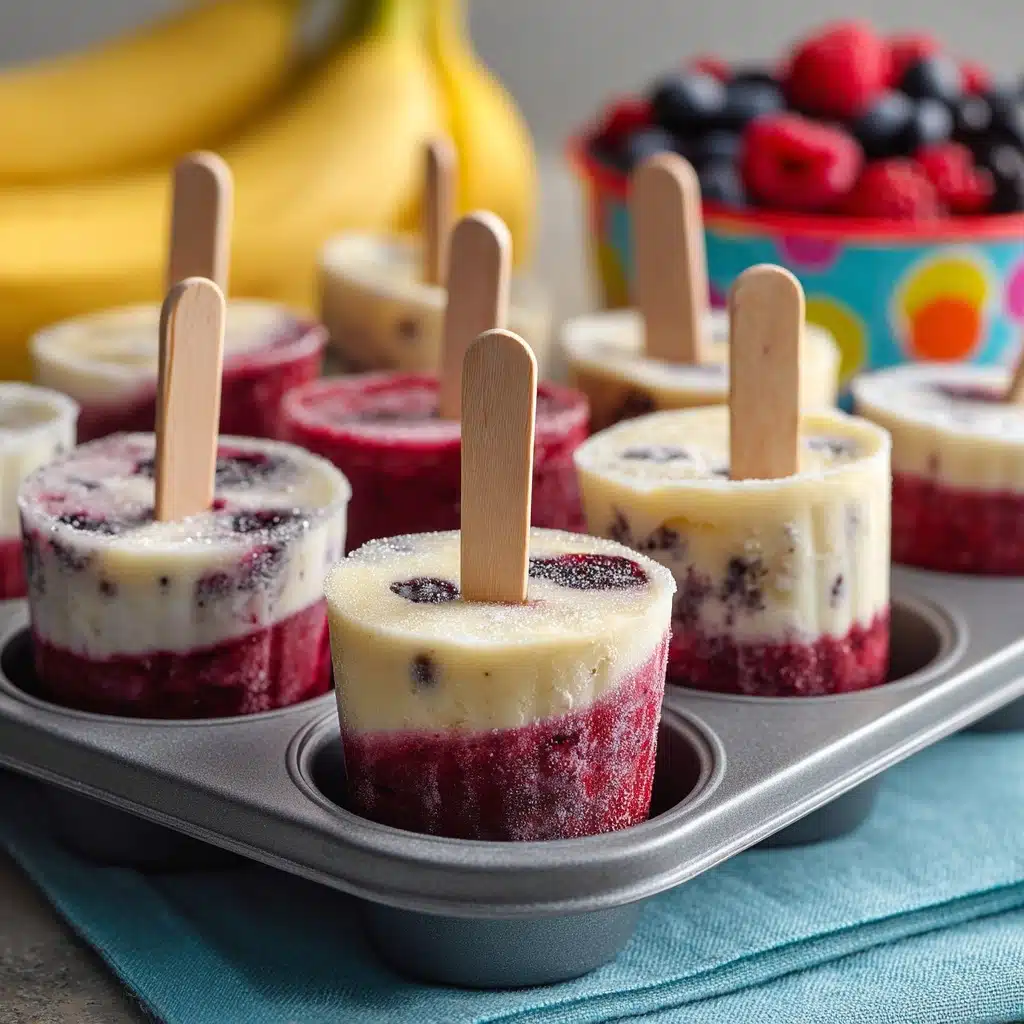
Frozen Yogurt Pops Recipe
There’s just something magical about homemade Frozen Yogurt Pops—they’re creamy, fruity, refreshingly cold, and surprisingly nutritious. These popsicles pack the tang of Greek yogurt, the sweetness of summer berries, and a delightful crunch from granola, making them the ultimate treat for warm days or anytime cravings strike. Best of all, they’re fuss-free, endlessly customizable, and loved by kids and adults alike. Whether you’re looking for a healthy dessert or a fun afternoon snack, these Frozen Yogurt Pops promise to brighten your day with every chilled, colorful bite.
Ingredients You’ll Need
-
Main Ingredients:
- 2 cups plain Greek yogurt
- 1/4 cup honey or maple syrup
- 1 teaspoon vanilla extract
Additional:
- 1 cup fresh mixed berries (such as strawberries, blueberries, raspberries)
- 1/2 cup granola
How to Make Frozen Yogurt Pops
Step 1: Mix the Yogurt Base
Start by grabbing a medium bowl and whisking together the Greek yogurt, your choice of honey or maple syrup, and the vanilla extract until the mixture is perfectly smooth. This ensures every pop will have balanced sweetness and that subtle, irresistible vanilla flavor throughout.
Step 2: Add the Berries
Gently fold in your mixed berries. You can leave them whole for beautiful, jewel-like bursts of fruit, or chop larger berries for more even distribution. This step brings both color and zing to your Frozen Yogurt Pops, and it’s so much fun to customize the blend.
Step 3: Layer with Granola
As you spoon the yogurt mixture into the popsicle molds, sprinkle in layers of granola. This adds a delightful crunch and turns each pop into a surprise with every bite. Feel free to get creative—more granola for extra crunch, or just a touch to let the berries shine.
Step 4: Pack and Freeze
Once your molds are filled, tap them lightly on the counter to eliminate any air pockets and ensure an even texture. Carefully insert popsicle sticks. Now it’s just a waiting game—freeze for at least 4 hours, or until the pops are solid and frozen through.
Step 5: Unmold and Enjoy
When you’re ready to enjoy your Frozen Yogurt Pops, run the outside of the molds under warm water for a few seconds. This will help loosen the pops without melting them. Gently pull them free, and prepare for big smiles all around!
How to Serve Frozen Yogurt Pops

Garnishes
With Frozen Yogurt Pops, little touches make a big difference. Try drizzling a pop with a bit of honey, rolling the end in extra granola or chopped nuts, or sprinkling with shredded coconut. These pretty garnishes add flavor and create a gorgeous, photo-worthy treat.
Side Dishes
Pair your pops with a bowl of extra fresh berries for a double dose of fruit, or enjoy alongside a platter of sliced melon or crispy apple slices. They’re also great with a refreshing glass of iced herbal tea for a mini afternoon pick-me-up.
Creative Ways to Present
For parties or family gatherings, arrange the pops upright in a bowl of ice so they stay chilled and inviting. Or, wrap each Frozen Yogurt Pop in a bit of parchment and tie with colorful ribbon for a festive, grab-and-go treat kids love. You can even set up a popsicle bar with different toppings for dipping and rolling—think mini chocolate chips, sprinkles, or crushed freeze-dried berries. Let everyone customize their pop!
Make Ahead and Storage
Storing Leftovers
Once your Frozen Yogurt Pops are fully frozen and removed from the molds, you can keep them wrapped in parchment or plastic wrap, then store them in a zip-top freezer bag. This prevents freezer burn and stops them from sticking together, so your snack stays as fresh as the day you made it.
Freezing
The beauty of these pops is that they freeze beautifully—just be sure to give them enough time (at least four hours, but overnight is even better for the firmest texture). Be patient, and you’ll be rewarded with perfectly set pops every time, ready whenever a craving hits.
Reheating
No reheating needed here! If your pops have been in the freezer for a long time and seem rock-hard, let them sit at room temperature for a couple of minutes to soften slightly. This gives you the perfect creamy texture and makes eating them pure joy.
FAQs
Can I use different fruits in my Frozen Yogurt Pops?
Absolutely! These pops are all about customization. Swap in mango, kiwi, peaches, or cherries—just be sure to chop larger fruits into small pieces so they distribute evenly. Using seasonal fruit keeps things fun and colorful year round.
How do I make these pops dairy-free?
It’s easy to adapt this recipe for dairy-free eaters. Simply use coconut yogurt (or any other non-dairy yogurt you love) as the base. You’ll get the same creamy texture with a delicious tropical twist.
Can I blend the berries instead of folding them in?
Of course! Blending the berries into the yogurt before filling the molds gives you a uniformly pink or purple pop with a smoother texture and bold berry flavor throughout. Or try half blended and half folded for a fun mix!
What’s the best way to get pops out of the mold neatly?
Running warm water over the outside of your molds for a few seconds really helps release the pops smoothly. Avoid twisting or yanking—just a gentle tug after warming usually does the trick.
How long will Frozen Yogurt Pops keep in the freezer?
If stored properly in an airtight container, they’ll stay fresh and delicious for up to two weeks. For the best texture, enjoy them within the first week while the granola is still crisp.
Final Thoughts
If you’re looking for a sweet and healthy treat that’s as fun to make as it is to eat, these Frozen Yogurt Pops are a total win. Whether you stick with the classic recipe or make it your own, I hope you love every chilly, berry-packed bite. Give them a try, share with friends, and let the smiles begin!
Print
Frozen Yogurt Pops Recipe
- Total Time: 4 hours 10 minutes
- Yield: 8 pops 1x
- Diet: Vegetarian, Gluten-Free
Description
Cool off this summer with these refreshing Frozen Yogurt Pops that are not only delicious but also healthy. Made with Greek yogurt, sweetened with honey or maple syrup, and packed with fresh mixed berries, these popsicles are a guilt-free treat for all ages.
Ingredients
Main Ingredients:
- 2 cups plain Greek yogurt
- 1/4 cup honey or maple syrup
- 1 teaspoon vanilla extract
Additional:
- 1 cup fresh mixed berries (such as strawberries, blueberries, raspberries)
- 1/2 cup granola
Instructions
- Prepare Yogurt Mixture: In a medium bowl, whisk together Greek yogurt, honey, and vanilla extract until smooth.
- Add Berries: Gently fold in the mixed berries.
- Fill Molds: Spoon the mixture into popsicle molds, layering with granola if desired. Tap the molds lightly on the counter to remove air pockets.
- Freeze: Insert sticks and freeze for at least 4 hours until solid.
- Serve: To remove, run warm water over the molds for a few seconds before pulling out the pops.
Notes
- For a dairy-free version, use coconut yogurt.
- You can blend the berries for a smoother texture or leave them whole for bursts of fruit.
- Adjust sweetness to taste.
- Prep Time: 10 minutes
- Cook Time: 0 minutes
- Category: Dessert, Snack
- Method: Freezing
- Cuisine: American
Nutrition
- Serving Size: 1 pop
- Calories: 95
- Sugar: 10 g
- Sodium: 20 mg
- Fat: 2.5 g
- Saturated Fat: 1 g
- Unsaturated Fat: 1.5 g
- Trans Fat: 0 g
- Carbohydrates: 15 g
- Fiber: 1 g
- Protein: 5 g
- Cholesterol: 5 mg


