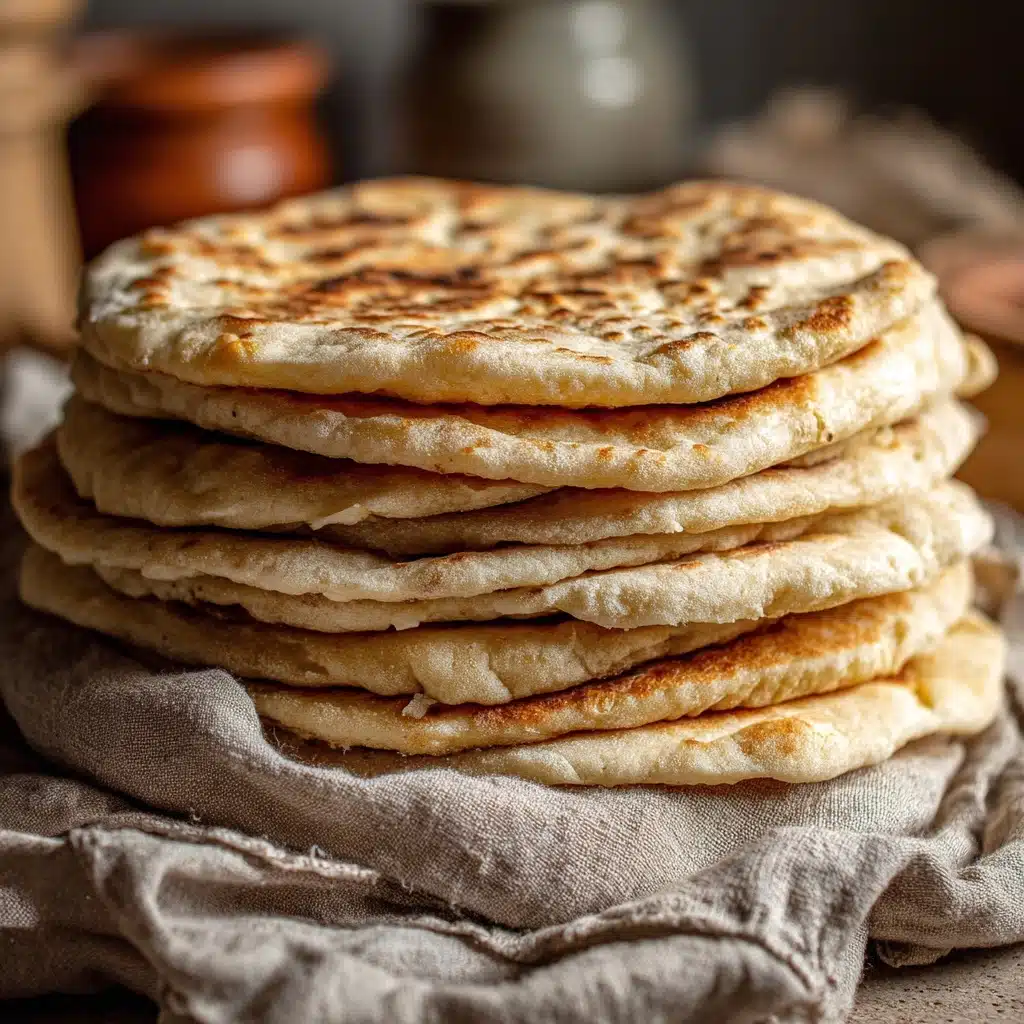
Homemade Pita Bread Recipe
If you’ve never experienced the joy of pulling a puffed, warm round of Homemade Pita Bread off the skillet, you’re truly in for a treat. With just a handful of pantry staples, you can enjoy soft, chewy pockets that put any store-bought version to shame. This recipe captures all the charm of classic Middle Eastern bread—perfect for wrapping, stuffing, dipping, or serving alongside your favorite meals. Get ready to discover just how easy and rewarding Homemade Pita Bread can be in your own kitchen!
Ingredients You’ll Need
These simple but essential ingredients work in harmony to create that fluffy center and golden, slightly chewy exterior we love in pita. Each one plays a role in the bread’s flavor, structure, and irresistible aroma.
- Active dry yeast: This is what gives your pita its airy pocket—never skip it!
- Granulated sugar: A pinch wakes up the yeast and gives slight tenderness to the dough.
- Warm water (about 110°F): Just the right temperature to activate the yeast and help the dough rise.
- All-purpose flour: The backbone of Homemade Pita Bread, providing a soft yet sturdy crumb (have a bit extra for kneading).
- Salt: Enhances the flavor of the bread and balances out the yeastiness.
- Olive oil: Adds a hint of richness and keeps the pita moist.
How to Make Homemade Pita Bread
Step 1: Bloom the Yeast
Begin by combining the warm water with sugar and active dry yeast in a large mixing bowl. Stir gently and let the mixture sit for about 5 to 10 minutes. If it’s foamy on top, congratulations—your yeast is alive and kicking, which is the secret to those iconic pita pockets.
Step 2: Mix and Knead the Dough
Next, add the flour, salt, and olive oil to your frothy mixture. Stir just until a soft dough forms—don’t worry if it seems a bit sticky at first! Turn the dough onto a lightly floured surface. Knead by hand for 8 to 10 minutes (it’s a workout, but totally worth it) until the dough transforms into a smooth, elastic ball. This step builds the structure that helps pita puff up beautifully.
Step 3: Let the Dough Rise
Drizzle a little olive oil inside a clean bowl and place the dough in, coating it lightly. Cover with a kitchen towel or plastic wrap and set in a warm, draft-free spot. In about an hour, the dough should double in size—an ultra-satisfying transformation that signals it’s ready for the next stage.
Step 4: Shape the Pitas
Punch down the risen dough to release excess air and divide into 6 to 8 equal portions. Roll each piece into a smooth ball, then flatten and use a rolling pin to shape each into a uniform 6- to 7-inch circle, about ¼ inch thick. Even thickness is the magic that helps them puff up!
Step 5: Cook on the Stovetop
Preheat a cast iron skillet or heavy-bottomed pan over medium-high heat. Once hot, add one dough round at a time. Cook for 1 to 2 minutes until bubbles appear, then flip and cook the second side until golden spots form and the pita is puffed. The aroma is intoxicating, and watching each pita balloon is surprisingly fun.
Step 6: Keep Pitas Soft
Transfer cooked pitas to a clean kitchen towel, folding it over to keep them warm and soft. This little trick traps steam, ensuring each pita remains pillowy and tender, ready for whatever fillings or dips your heart desires.
How to Serve Homemade Pita Bread

Garnishes
Homemade Pita Bread loves a bit of flair! Brush your warm pitas with a touch more olive oil and a sprinkle of flaky sea salt, za’atar, or toasted sesame seeds. A dash of chopped fresh parsley or cilantro adds a fresh pop of color and flavor to every bite.
Side Dishes
Pair your pitas with a creamy bowl of hummus, smoky baba ganoush, or a crisp chopped salad. They’re fantastic for scooping up vibrant dips, and also make a hearty companion to soups, stews, or grilled vegetables.
Creative Ways to Present
For a fun twist, slice the bread into triangles and bake briefly for homemade pita chips—ideal with dips or charcuterie boards. Or, split open the puffy center and stuff with falafel, spiced chicken, or roasted veggies for the ultimate sandwich experience.
Make Ahead and Storage
Storing Leftovers
Once cooled, Homemade Pita Bread keeps nicely in an airtight container at room temperature for up to three days. If they start to lose a bit of softness, don’t worry—there’s an easy fix for that.
Freezing
Pitas freeze beautifully! Just let them cool completely, then stack with parchment between each bread and store in a freezer-safe bag. They stay fresh for up to three months, so you can always have some on hand.
Reheating
To revive pitas, wrap in foil and warm in a 300°F oven for 5 to 10 minutes, or pop them in the microwave under a damp paper towel for 15-20 seconds. They’ll come out soft, flexible, and just like freshly baked.
FAQs
Why didn’t my Homemade Pita Bread puff up?
This usually comes down to dough thickness and skillet heat. Be sure your disks are around ¼ inch thick and your pan is hot enough. Also, proper kneading and rising are essential for a good pocket.
Can I use whole wheat flour for Homemade Pita Bread?
Yes, substitute half or all of the all-purpose flour with whole wheat for a nuttier, heartier pita. You may need to add a touch more water, as whole wheat absorbs more liquid.
What’s the best way to keep Homemade Pita Bread soft?
Right after cooking, stack the pitas and wrap in a clean towel. This traps steam and keeps them perfectly pillowy until serving.
Is store-bought yeast okay, or do I need fresh yeast?
Active dry yeast is perfect for this recipe and the most convenient option. If you have fresh yeast on hand, you can use it but adjust the amount accordingly—generally double for fresh.
Can I bake Homemade Pita Bread instead of using a skillet?
Absolutely! Place the rolled-out dough on a preheated baking stone or inverted baking sheet in a 475°F oven. Just two or three minutes is all it takes for gorgeously puffed, lightly charred pitas.
Final Thoughts
Once you try making Homemade Pita Bread from scratch, you’ll never look at the packaged kind the same way again. It’s easy, satisfying, and just so flavorful—so why not invite a friend over, whip up a batch, and share the fresh-baked magic? Your table is about to get a whole lot tastier!
Print
Homemade Pita Bread Recipe
- Total Time: 1 hour 30 minutes (including rise time)
- Yield: 6–8 pitas 1x
- Diet: Vegan
Description
Learn how to make delicious Homemade Pita Bread from scratch. These soft and fluffy pitas are perfect for dipping, stuffing, or as a side to your favorite Middle Eastern dishes.
Ingredients
Dough:
- 2 ¼ teaspoons active dry yeast (1 packet)
- 1 teaspoon granulated sugar
- 1 cup warm water (about 110°F)
- 2 ½ cups all-purpose flour (plus more for kneading)
- 1 teaspoon salt
- 1 tablespoon olive oil
Instructions
- Activate Yeast: In a large mixing bowl, combine warm water, sugar, and yeast. Let sit until foamy.
- Mix Dough: Add flour, salt, and olive oil. Knead until smooth and elastic.
- Rise: Let dough rise until doubled in size.
- Shape: Divide into pieces, roll out into circles.
- Cook: Cook in a skillet until puffed and golden.
- Serve: Keep warm under a towel.
Notes
- For oven-baked pita, bake at 475°F for 2–3 minutes.
- Store leftovers in an airtight container or freeze.
- Prep Time: 15 minutes
- Cook Time: 15 minutes
- Category: Bread
- Method: Stovetop
- Cuisine: Middle Eastern
Nutrition
- Serving Size: 1 pita
- Calories: 180
- Sugar: 1g
- Sodium: 250mg
- Fat: 3g
- Saturated Fat: 0.5g
- Unsaturated Fat: 2g
- Trans Fat: 0g
- Carbohydrates: 33g
- Fiber: 1g
- Protein: 5g
- Cholesterol: 0mg


